Camera
This page is up to date for MonoGame.Extended 6.0.0. If you find outdated information, please open an issue.
A camera in a 2D game provides a viewport into your game world, controlling what portion of the world is visible on screen and how it appears. Rather than manually repositioning every game object to simulate camera movement, the camera system uses transformation matrices to efficiently control the rendering view while your game objects remain at their world positions.
The Problem: Managing What's On Screen
When building a game, you face a fundamental challenge: how do you control what the player sees? Consider a platformer game where the player character moves through a large level. You need to follow the player, showing the relevant portion of the level while keeping everything else offscreen.
There are two approaches you could take:
Approach 1: Move Everything Manually
You could update the position of every game object each frame to simulate camera movement:
protected override void Update(GameTime gameTime)
{
    // Calculate camera movement
    Vector2 cameraMovement = GetCameraMovement();

    // Move every object in the opposite direction
    foreach (var enemy in _enemies)
    {
        enemy.Position -= cameraMovement;
    }

    foreach (var tile in _tiles)
    {
        tile.Position -= cameraMovement;
    }

    foreach (var particle in _particles)
    {
        particle.Position -= cameraMovement;
    }

    _background.Position -= cameraMovement;

    // ... and so on for every object in your game
}
This approach has several significant drawbacks:
- High complexity: You must update every single object, every frame
- Performance overhead: Looping through and modifying thousands of objects is expensive
- Error-prone: Easy to forget objects or miscalculate positions
- Difficult to extend: Adding zoom or rotation becomes exponentially more complex
Approach 2: Use a Camera with Matrix Transformation
Instead of moving objects, you can use a camera that applies a transformation matrix to the rendering process:
protected override void Draw(GameTime gameTime)
{
    // Get the camera's transformation matrix
    Matrix transformMatrix = _camera.GetViewMatrix();

    // Apply the transformation to the sprite batch
    _spriteBatch.Begin(transformMatrix: transformMatrix);

    // Draw everything using their actual world positions
    foreach (var enemy in _enemies)
    {
        enemy.Draw(_spriteBatch); // Uses enemy's world position
    }

    // The camera transformation handles the rest
    _spriteBatch.End();
}
This approach is far superior:
- Simple: One transformation affects all rendering
- Efficient: Matrix multiplication is highly optimized by the GPU
- Maintainable: Game objects keep their actual world positions
- Flexible: Adding zoom, rotation, and other effects is straightforward
The camera doesn't move your game objects. It transforms how they're rendered to the screen. Your objects stay at their world positions while the camera determines which portion of the world is visible and how it appears.
The purpose of a camera is to provide a quick way show the game world from a different position in space. The way the camera does this is by using a transformation matrix that changes the way a sprite batch is rendered to the screen. This allows no movement of objects, and instead, moves the projected image on screen space.
Understanding Transformation Matrices
The camera works by providing a transformation matrix to the SpriteBatch. This matrix is a mathematical construct that describes how to transform coordinates from one space to another—in this case, from world space (where your objects live) to screen space (what appears on the monitor).
A virtual camera viewing a 2D world from three different perspectives. The camera transforms how the world is projected onto the screen without moving the actual objects.
When you pass a transformation matrix to SpriteBatch.Begin(), every sprite drawn within that batch is automatically transformed according to the matrix. The transformation can include:
- Translation: Shifting the view left, right, up, or down
- Rotation: Rotating the view around a point
- Scale: Zooming in or out
The matrix combines these transformations into a single mathematical operation that the GPU applies efficiently to every vertex in your sprites.
How the Transformation Works
Here's what happens when you use a camera transformation:
- You draw a sprite at its world position, for example
(500, 300) - The
SpriteBatchapplies the camera's transformation matrix to this position - The GPU calculates the final screen position using matrix multiplication
- The sprite appears at the transformed screen position
This process happens automatically for every sprite you draw, making it incredibly efficient compared to manually calculating and updating positions.
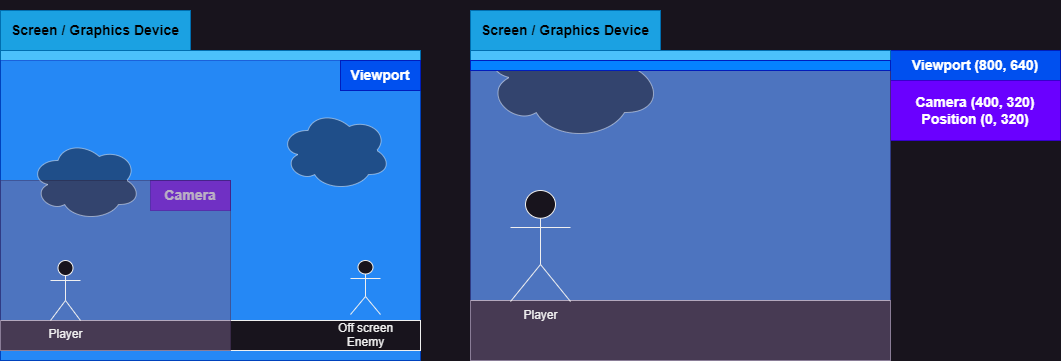
The conceptual layers of the camera system. The camera defines a viewable area within the larger game world, transforming world coordinates to screen coordinates.
What You Can Accomplish with Cameras
The camera system enables a wide range of visual effects and gameplay features that would be difficult or impossible to achieve by manually moving objects:
Following Game Objects
The camera can smoothly follow a player character or other entity through the game world, keeping the focus on the action:
protected override void Update(GameTime gameTime)
{
    // Camera automatically centers on the player
    _camera.LookAt(_player.Position);
}
Zoom Effects
Create dramatic zoom effects for emphasis, such as zooming in when entering a building or zooming out to show a strategic overview:
// Zoom in for a close-up view
_camera.Zoom = 2.0f; // 200% magnification

// Zoom out for a strategic view
_camera.Zoom = 0.5f; // 50% magnification
Rotation Effects
Rotate the entire view for special effects, such as tilting the camera during a dramatic moment or creating a spinning transition:
// Rotate the camera 45 degrees
_camera.Rotation = MathHelper.ToRadians(45);
Cinematic Letterboxing
Adjust the viewport adapter to create cinematic letterbox effects for cutscenes or dramatic moments:
// Use a boxing viewport adapter to maintain aspect ratio
var viewportAdapter = new BoxingViewportAdapter(Window, GraphicsDevice, 800, 480);
_camera = new OrthographicCamera(viewportAdapter);
Smooth Camera Movement
Create fluid camera movements along paths or curves using interpolation techniques:
// Smoothly move toward target position
Vector2 targetPosition = _targetEntity.Position;
_camera.Position = Vector2.Lerp(_camera.Position, targetPosition, 0.1f);
Screen Shake Effects
Implement impactful screen shake for explosions, impacts, or other dramatic events:
// Apply temporary random offset to camera position
_camera.Position += new Vector2(
    Random.NextFloat(-shakeIntensity, shakeIntensity),
    Random.NextFloat(-shakeIntensity, shakeIntensity)
);
Parallax Scrolling
Create depth perception by moving different visual layers at different speeds:
// Background moves slower than foreground
Matrix backgroundMatrix = _camera.GetViewMatrix(new Vector2(0.3f, 0.3f));
Matrix foregroundMatrix = _camera.GetViewMatrix(new Vector2(1.0f, 1.0f));
These effects can be combined. For example, you can have a camera that follows the player while zooming in, rotating, and applying screen shake all at the same time. The transformation matrix handles all of these operations together.
Camera Types in MonoGame.Extended
MonoGame.Extended provides camera implementations optimized for different game types and perspectives. Currently, the following camera type is available:
Orthographic Camera
The OrthographicCamera is designed for 2D games and provides a view with no depth perception. This is the camera type you'll use for most 2D games, including:
- Platformers: Side-scrolling games like Super Mario or Celeste
- Top-down games: RPGs, strategy games, or twin-stick shooters
- Puzzle games: Match-3, tile-based puzzles, or physics puzzlers
- 2D action games: Fighting games, beat-em-ups, or side-scrolling shooters
The OrthographicCamera provides all the features discussed above and is the foundation of the camera system in MonoGame.Extended.
Future versions of MonoGame.Extended may include additional camera types such as isometric cameras for isometric games or perspective cameras for 2.5D games. The abstract Camera<T> base class provides the foundation for implementing custom camera types if you have specialized needs.
The Camera Base Class
The Camera<T> class is an abstract base class that defines the common interface for all camera types in MonoGame.Extended. You won't create instances of Camera<T> directly; instead, you'll use concrete implementations like OrthographicCamera.
The base class defines the essential camera operations:
- Position and movement:
Position,Move(),LookAt() - Rotation:
Rotation,Rotate() - Zoom:
Zoom,ZoomIn(),ZoomOut() - Coordinate conversion:
WorldToScreen(),ScreenToWorld() - Matrix generation:
GetViewMatrix(),GetInverseViewMatrix() - Visibility testing:
Contains(),GetBoundingFrustum()
This consistent interface ensures that different camera types work the same way, making it easy to switch between camera implementations if your needs change.
Creating Custom Camera Types
If you need specialized camera behavior, you can create your own camera type by inheriting from Camera<T>:
public class IsometricCamera : Camera<Vector2>
{
    // Implement abstract members with isometric projection logic
    public override Matrix GetViewMatrix()
    {
        // Custom isometric transformation
    }

    // ... other required implementations
}
This extensibility ensures that the camera system can grow to meet specialized requirements while maintaining a consistent interface.
Getting Started with Cameras
To start using cameras in your game:
- Choose a camera type: For most 2D games, start with the
OrthographicCamera - Create and configure the camera: Initialize the camera with a viewport adapter for proper scaling
- Apply the camera transformation: Pass the camera's view matrix to
SpriteBatch.Begin() - Update the camera: Move, zoom, or rotate the camera in your
Update()method based on gameplay needs
Here's a minimal example to get started:
public class Game1 : Game
{
    private OrthographicCamera _camera;
    private SpriteBatch _spriteBatch;

    protected override void Initialize()
    {
        base.Initialize();

        // Create camera with viewport adapter
        var viewportAdapter = new BoxingViewportAdapter(Window, GraphicsDevice, 800, 480);
        _camera = new OrthographicCamera(viewportAdapter);
    }

    protected override void Update(GameTime gameTime)
    {
        // Update camera position based on player or input
        _camera.Position = _player.Position;

        base.Update(gameTime);
    }

    protected override void Draw(GameTime gameTime)
    {
        GraphicsDevice.Clear(Color.CornflowerBlue);

        // Apply camera transformation
        _spriteBatch.Begin(transformMatrix: _camera.GetViewMatrix());

        // Draw your game world
        _player.Draw(_spriteBatch);

        _spriteBatch.End();

        base.Draw(gameTime);
    }
}
For detailed information on using the OrthographicCamera, including advanced features like world bounds, parallax scrolling, and coordinate conversion, see the Orthographic Camera documentation.
Best Practices
When working with cameras in your games, keep these guidelines in mind:
Use Viewport Adapters
Always use a ViewportAdapter when creating cameras. Viewport adapters handle screen scaling and aspect ratio management, ensuring your game looks correct on different resolutions and screen sizes:
// Good - Uses viewport adapter for proper scaling
var viewportAdapter = new BoxingViewportAdapter(Window, GraphicsDevice, 800, 480);
var camera = new OrthographicCamera(viewportAdapter);

// Avoid - Direct graphics device usage doesn't handle scaling well
var camera = new OrthographicCamera(GraphicsDevice);
Separate World and Screen Spaces
Maintain a clear separation between world space (where objects exist) and screen space (what appears on screen). Store all game object positions in world coordinates and let the camera handle the transformation:
// Good - Object uses world position
_enemy.Position = new Vector2(1000, 500); // World position
_camera.Position = _player.Position;      // Camera follows player

// Avoid - Mixing world and screen coordinates leads to confusion
_enemy.ScreenPosition = new Vector2(400, 300); // Don't do this
Update Camera Before Drawing
Always update the camera position in the Update() method, not in the Draw() method. This ensures consistent behavior and separates game logic from rendering:
// Good - Update camera in Update method
protected override void Update(GameTime gameTime)
{
    _camera.LookAt(_player.Position);
}

protected override void Draw(GameTime gameTime)
{
    _spriteBatch.Begin(transformMatrix: _camera.GetViewMatrix());
    // ... drawing code
}

// Avoid - Updating camera in Draw method
protected override void Draw(GameTime gameTime)
{
    _camera.Position = _player.Position; // Don't update state in Draw
    _spriteBatch.Begin(transformMatrix: _camera.GetViewMatrix());
}
Consider Performance
Use the camera's Contains() methods to cull offscreen objects and avoid drawing things the player can't see:
foreach (var enemy in _enemies)
{
    if (_camera.Contains(enemy.Position) != ContainmentType.Disjoint)
    {
        enemy.Draw(_spriteBatch);
    }
}
Summary
The camera system in MonoGame.Extended provides a powerful and flexible way to control how your 2D game world is displayed. By using transformation matrices instead of manually repositioning objects, you gain:
- Simplicity - One transformation affects all rendering
- Performance - GPU-optimized matrix operations
- Flexibility - Easy to add zoom, rotation, and other effects
- Maintainability - Clean separation between world and screen coordinates
The OrthographicCamera provides everything you need for 2D games, with features like smooth following, zoom control, rotation, world bounds constraints, and parallax scrolling.
To learn more about implementing cameras in your game, continue to the Orthographic Camera documentation.
Further Reading
- Matrix Basics - Understanding the mathematics behind camera transformations
- Orthographic Camera - Detailed guide to the
OrthographicCameraimplementation